Incorrectly sized images can hurt your website’s performance — and lose sales. But you can reduce image size without reducing quality, in Photoshop, via free web tools and plugins, or through a more robust paid offering.
Images are crucial to your website. They provide visual cues for users and strengthen your brand identity — and product photos are an integral part of an online shopper’s experience.
Plus, when your images are optimized for SEO, they can drive lots of new traffic (and boost sales!) Particularly if you have an online store or photography portfolio, images are the defining reason users visit your site in the first place, right? Poor images is simply not an option.
However, if you’re uploading images to your site that are too large in size, they could slow page load time and, in turn, contribute to higher bounce rates and lost sales. If you’ve ever reduced the size of an image, you’re likely aware of the risk of damaging the quality of the image.
But there are ways to reduce image size and preserve quality. Here’s how:
How to Reduce Image Size in Photoshop
For this tutorial, we used Adobe Photoshop CC 2017. The exact steps may vary for other versions of Photoshop.
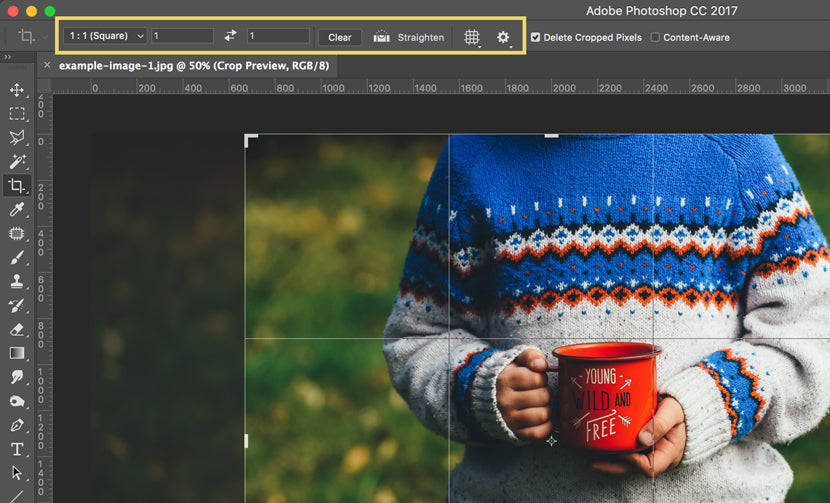
First, determine your ideal image aspect ratio and if your image needs to be cropped — this will be dictated by what type of photo it is, and where it will be used on your site (main product image, product thumbnail, homepage banner, etc.)
If you’re cropping an image for a thumbnail, you can easily select a 1:1 aspect ratio in the top, left hand corner after selecting the Crop tool.
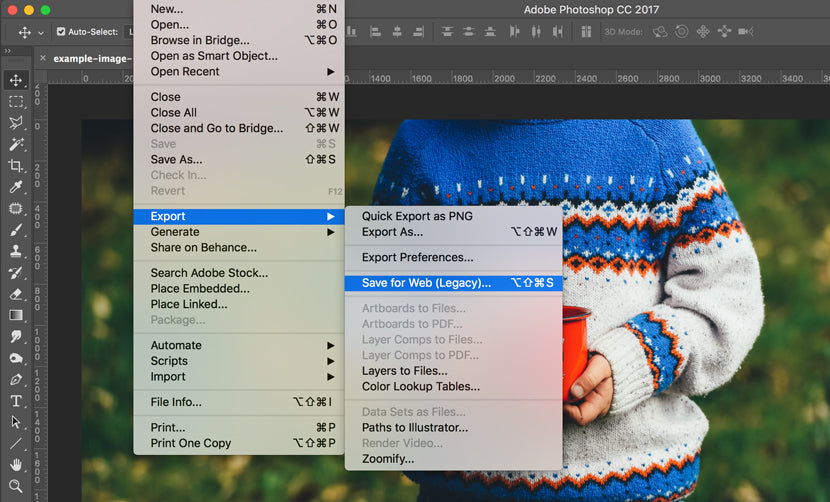
Next, it’s time to alter your image’s size and compression quality, both of which you can do with Photoshop’s Save for Web tool.
File > Export > Save for Web (Legacy)
And here comes the tricky part — actually altering an image’s size and compressing it.
In the Save for Web window, there are several functions to pay attention to.
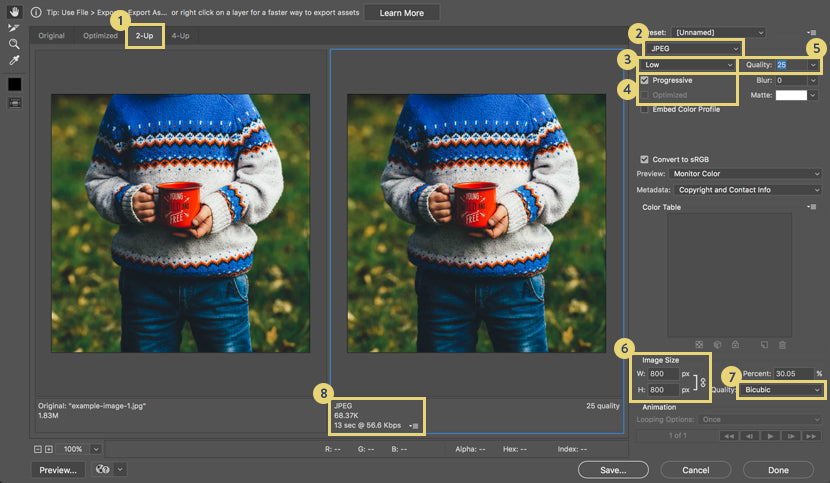
- 2-UP (and 4-UP): This provides a side-by-side comparison of the original image to the compressed file. 4-UP automatically generates options with lower compression for additional comparison.
- File format: A .jpeg format is going to allow for the most compression.
- Compression quality: Choose from presets low, medium, high, very high and maximum, depending on your compression and file sizing needs.
- Progressive vs. optimized: Progressive is the best choice, but it’s not always compatible with all browsers. Progressive allows an image to load in multiple passes, with increasing resolution and quality. Optimized also allows for additional compression, but files are not as compatible. You can select one or neither.
- Quality slider: Incrementally scale quality to increase compression, while preserving image quality.
- Image size: Set the dimensions of your image. If you know the exact dimensions you need, you can enter them here. Or, if you want to reduce the size by a percentage, you can use the Percent scaler as well. Always keep proportions constrained by making sure the lock icon/toggle is selected. This ensures your image won’t become distorted when you alter the image size.
- Resampling selection: This is how Photoshop “rebuilds” parts of the image’s data that are altered during compression. Any time you enlarge or reduce an image’s size, you’re going to affect the original proportion that the image had in relation to pixels per inch and dimensions. Bicubic creates smoother gradients, but does not allow for the most compression. Explore other options such as Nearest Neighbor (most basic and worst preservation of detail), Bilinear (usually better for upsampling), Bicubic Smoother (designed for upsampling) or Bicubic Sharper (better for downsampling/preserves detail).
- Image file size and download rate: This displays file format, current file size of the optimized image and the current download rate of the image based on various internet speeds.
There is no one-size-fits-all option here. When reducing an image in Photoshop, each image generally takes an individualized amount of tweaking to find the best image quality with the best compression.
Optimizing your product photos can be a time-consuming undertaking. Get a quote now for affordable image optimization services!
Free Web Tools to Edit Images and Reduce File Size
Pixlr: With Pixlr, you can resize and also edit photos as needed. The image-editing site also has a free vector-editing tool, as well as free fonts and graphics you can use.
Canva: Canva’s free photo editor allows you to crop and resize images on their site. Additional free editing tools include flipping and rotating images, adjusting the color, and adding filters.
Web Tools to Compress Images and Reduce File Size
TinyJPG/TinyPNG: This site allows you to reduce the file size of your images. There are no editing features; instead, TinyJPG/TinyPNG focuses on compressing files to ultimately reduce the file size, stripping unnecessary data from your image. This also preserves quality and is best used as a complementary tool to other editing techniques used to reduce file size. TinyJPG/TinyPNG are free to use.
Bulk Web Resizer: Do reduce file size for images in bulk, this site allows you upload a batch of images and then resize according to your desired dimensions. You can also adjust the image quality to your needs (choose 100 if you want to preserve the original quality), as well as sharpen images.
ImageOptim: ImageOptim can be used in your web browser or via a Mac application. To shrink files, ImageOptim gets rid of EXIF metadata, such as GPS position and the camera’s serial number — however, you can choose to keep specified metadata intact (which is essential to optimizing your product photos for SEO).
There’s also a Lossy minification option, which ImageOptim says will result in the smallest file size possible, while preserving image quality. ImageOptim has pricing plans, starting at $9/month for 1,000 image optimizations.
More Tools to Compress Images and Reduce File Size
pngquant: This tool will compress .png files to reduce the file size. “The conversion reduces file sizes significantly (often as much as 70%) and preserves full alpha transparency. Generated images are compatible with all web browsers and operating systems,” the site says.
Kraken: Kraken has a web application and a developer API that can handle bulk image optimization and resizing. The simple web interface is free, and you can drag and drop photos or upload by entering the image URL. There are also different pricing options depending on how many images you work with and how frequently you need to reduce their size. Pricing is based on the total number of GB.
Plugins That Reduce Image Size Within Your CMS
There are tons of plugins on the market that make the image resizing process easier and more automated, all from within your CMS. Here are a just a few:
WordPress
Shopify
- Image Optimizer - Image Compression and Optimization
- Crush.pics - Image Compression and Optimization
- ImageRecycle image compression
- SEO Photo Optimizer
- Minifier - Image and Website Optimization
Magento
Outsource Your Image Resizing Needs
Additionally, if you have a very large amount of images that you need compressed or resized, you might want to consider exploring outsourcing options. Many image-editing services will also be able to perform other editing tasks, such as background removal or drop shadow.
The Bottom Line
When it comes down to it, finding the best solution to reduce the file size of your images while maintaining quality depends on your specific needs. One-off images can easily be handled on your own with free web tools, applications and plugins. But if you’re uploading images to your site in bulk, a more robust — and sometimes paid — solution may make the best sense for your business, especially if you need more than just resizing and compression.
clipping path service
clipping path service
clipping path service
photoshop face swap
face swap photoshop
how to swap heads in photoshop
how to create a drop shadow in photoshop
reduce image size without losing quality photoshop
best camera for product photography
amazon image requirements
swap face in photoshop
convert to vector
amazon picture requirements
hair background
digital photos backgrounds
shoe photography
photoshop remove all white
face swap photo editor
change heads in photoshop
clipping path in photoshop
photoshop clipping paths
swapping faces in photoshop
reduce file size photoshop
how to swap faces in photoshop
reduce image file size photoshop
how to change file size in photoshop
how to replace sky in photoshop
magic wand tool in photoshop
reduce image size photoshop
sky replacement photoshop
blue background photoshop
product photography background
photoshop sky replacement
photoshop clipping paths
photoshop practice photos
product dimensions on amazon
amazon image size requirements
best size for amazon images
amazon image guidelines
portrait photography white background
photoshop clothing
off white backgrounds
blue photoshop background
ebay photo dimensions
amazon photo requirements
photoshoot style
what is photo editing
500x500 background
pen tool icon
auto face swap
etsy photos size
masking magic
how to face swap
ecommerce photo
product background
mannequin images
path images
image masking
ebay image size
etsy photo size
ebay picture size
photoshop reduce file size
ecommerce photography
etsy listing photo size
amazon product image requirements
amazon image requirements
photoshop practice pictures
reduce file size in photoshop
best camera for product photography
product dimensions amazon format
photoshop reduce image size
amazon product image size
hair transparent background
photoshop practice images
best image size for ebay
sky background images for photoshop
off-white background
beauty product photography
how to reduce image file size in photoshop
magic wand tool photoshop cs6
how to use photoshop cs6
how to change background color in photoshop cs6
how to remove white background in photoshop cs6
how to change background in photoshop cs6
how to reduce image size in photoshop without losing quality
how to get rid of whitespace in photoshop
how to take pictures for amazon
how to change the sky in photoshop
photoshop cs6 change background color
how to replace a sky in photoshop
how to photoshop faces onto things
how to photoshop a face onto another body
remove background color photoshop
how to blend faces in photoshop
how to do a face swap in photoshop
how to put a picture on a background in photoshop
clipping path service
clipping path service
photoshop face swap
face swap photoshop
how to swap heads in photoshop
how to create a drop shadow in photoshop
reduce image size without losing quality photoshop
best camera for product photography
amazon image requirements
swap face in photoshop
convert to vector
amazon picture requirements
hair background
digital photos backgrounds
shoe photography
photoshop remove all white
face swap photo editor
change heads in photoshop
clipping path in photoshop
photoshop clipping paths
swapping faces in photoshop
reduce file size photoshop
how to swap faces in photoshop
reduce image file size photoshop
how to change file size in photoshop
how to replace sky in photoshop
magic wand tool in photoshop
reduce image size photoshop
sky replacement photoshop
blue background photoshop
product photography background
photoshop sky replacement
photoshop clipping paths
photoshop practice photos
product dimensions on amazon
amazon image size requirements
best size for amazon images
amazon image guidelines
portrait photography white background
photoshop clothing
off white backgrounds
blue photoshop background
ebay photo dimensions
amazon photo requirements
photoshoot style
what is photo editing
500x500 background
pen tool icon
auto face swap
etsy photos size
masking magic
how to face swap
ecommerce photo
product background
mannequin images
path images
image masking
ebay image size
etsy photo size
ebay picture size
photoshop reduce file size
ecommerce photography
etsy listing photo size
amazon product image requirements
amazon image requirements
photoshop practice pictures
reduce file size in photoshop
best camera for product photography
product dimensions amazon format
photoshop reduce image size
amazon product image size
hair transparent background
photoshop practice images
best image size for ebay
sky background images for photoshop
off-white background
beauty product photography
how to reduce image file size in photoshop
magic wand tool photoshop cs6
how to use photoshop cs6
how to change background color in photoshop cs6
how to remove white background in photoshop cs6
how to change background in photoshop cs6
how to reduce image size in photoshop without losing quality
how to get rid of whitespace in photoshop
how to take pictures for amazon
how to change the sky in photoshop
photoshop cs6 change background color
how to replace a sky in photoshop
how to photoshop faces onto things
how to photoshop a face onto another body
remove background color photoshop
how to blend faces in photoshop
how to do a face swap in photoshop
how to put a picture on a background in photoshop
None other thank http://www.ipiploo.com
ReplyDeleteThis is the most important tutorial for photoshop.It'll help us a lot.Thanks .
ReplyDeleteWOw! Such an awesome campfire blog put here. <a href="https://fixipixi.com/about-us>My Website</a>
ReplyDeleteExcellent tutorial about the photoshop. thanks for sharing with us.
ReplyDeleteBest Regards,
photoshop image masking
Very helpful guide—reducing image file size while keeping quality is always a challenge, especially for web and eCommerce use. Proper resizing and compression really make a big difference in performance and loading speed.
ReplyDeleteI also work with image editing and optimization for clean, professional visuals:
https://cutoutimageretouching.com/e-commerce-photo-editing/