From finding the right props to creating dimension, learn how you can save money on styling your next product photoshoot.
Every commercial photographer and ecommerce retailer knows the importance of product photography. Most consumers want at least three images, prefer product photography over user-generated photos, and will leave your site if they can’t find the product content they seek.
And when it comes to consumers’ woes, the second-biggest complaint is “ordering a product online that looks different than what I receive” (with “not enough photos of the product” coming in at third).
78% of online shoppers want to see more images on ecommerce sites, but acquiring all those high-quality product photos could be a challenge: from hiring a professional commercial photographer to understanding how to budget for your needs.
That’s why some DIY and creativity can help you save money without sacrificing the quality of your product photos. A professional product photo stylist alone could cost hundreds of dollars for a single day, so here are some ways you can play the role yourself.
Make a Plan
Though it may seem predictable advice, starting out with a documented plan could be your quickest way to success in your first go as a product photoshoot stylist. Your plan needs to touch on a few key areas: the logistics, the creative and the market.
Logistics
When it comes to any photoshoot, there are many tiny details that must be considered. It’s easy for something to fall through the cracks, especially if it’s not written down. If you have colleagues or employees helping you, it becomes even more important to document everything.
Creating a schedule is essential to ensure you’re on track and everyone at the shoot is on the same page. If people don’t know where to be and when, the shoot will become chaotic and not as productive as you’d hope it could be.
Establish a budget beforehand, estimating extra expenses for props you’ll have to purchase, as well as other supplies that will help you style the photos.
Creative
As far as the creative execution and the styling you’ll be doing at the shoot, it’s always helpful to start with a specific vision or inspiration.
Create a mood board of other photos you like and will fit the brand. Make note of the specific styling choices in those photos, and look for consistencies. Those are commonalities you’ll want to replicate in your own way.
After you’ve documented your vision, make sure you have the supplies you need to bring that vision to life. It’s always helpful to think of an overarching story you’re trying to tell about the brand or the product, and make sure every photo ladders back up to that story.
Market
While your personal creative vision is great, it’s also important to understand whether it will resonate with your target market. At the end of the day, you need these pictures to sell the product you’re shooting.
Research who your target market is (essentially, they are your ideal customers) and see what they’re talking about online as it relates to your product. Browse forums, look at social media, and eye your competition to glean insights into the market.
Get the Right Supplies
After you’ve documented your plan, creative ideas and audience, you’ll need to ensure you have everything to style the shoot accordingly. If you’re a professional photographer, some of these items might already be on your must-have list:
- White background
- White bounce cards made of foam
- Table
- Tape
- Plenty of lighting
- Table cloths
- Binder clips
- Props

Props
Props are one of the biggest parts of a product photoshoot stylist’s job. The props set the scene in which your product is living. Without the right props, your photos could fall flat. The first rule of thumb is to have plenty of props. You don’t want to run out, and it’s always better to have too many than not enough.
Finding props
When you’re looking for props, keep an eye out for interesting elements, such as height, color, shape, texture and dimension. The more unique the better.
Take a look at the example below from Fugoo, an ecommerce retailer that sells mobile speakers. Instead of a standard drink glass, they used a coconut with playful garnishes. It’s eye-catching and creates a more visually appealing product photo.

Go to stores like Walmart or Target, search local vintage or secondhand shops, and browse artisan fairs to stock up on items. If you plan to DIY the styling for many product photography shoots, it’s a good idea to build an inventory of interesting and brand-cohesive props.
Remember to avoid props with logos (although we can edit those out for you), and account for color variations of your product. It’s ideal to shoot the different colors, but if you’re unable to do so, we can also help you edit the colors to look realistic.
It’s okay to go outside the box. In fact, it’s encouraged — as long as it works with your brand and jives with your target market.
Brooklyn Candle Studio uses natural elements to stage their product photos for their extensive candle collection. The brand describes themselves as “simple and minimal with a hint of charm,” and their product photoshoot styling complements that brand identity.

Sell the lifestyle
The ultimate motivation for your customers to purchase your products is the lifestyle aspiration that accompanies the product. In fact, 78% online consumers want images to bring products to life. Style the photos so they promise the dream to life for customers.
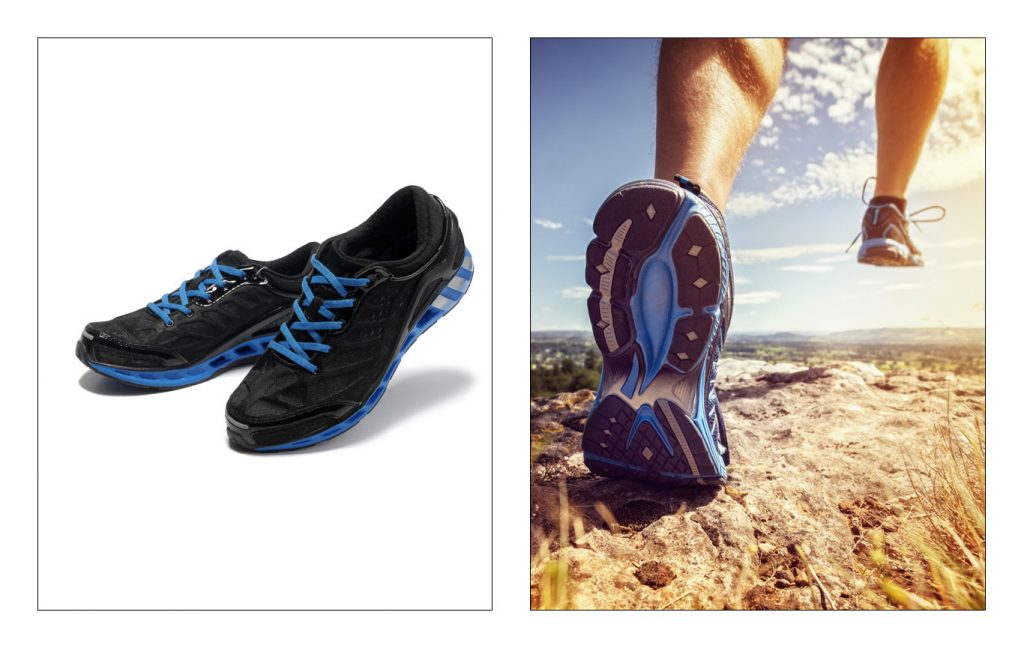
Take a look at an example: Rather than selling outdoor gear and apparel, REI sells the lifestyle of an outdoors enthusiast. A photo of their products literally in the wild is much more compelling than a camping chair against a white background or in a beautifully landscaped backyard.

Consider the channel
REI’s lifestyle product photo of one of their camping chairs in use is a great strategy for social media, but for the ecommerce product page, the main image should probably be simpler and on a white background.
When you’re styling your shots, remember which medium or channel you’re taking the photo for. If it’s meant for the product page, simpler is usually better. If you’re looking to spark engagement on social media, more creative executions are warranted. Take a look at watch retailer Bulova. One of their products, the men’s Curv Chronographwatch is featured on the site and on social media in different ways. On the product page, the retailer uses the standard all-white background, multiple angles and simple execution.
On social, they took a more creative approach to the product shot. Instead of a plain background, the watch is depicted “in the wild.” The wearer is skateboarding, has stylish sneakers and a dress shirt sleeve peeking through, exuding playful yet sophisticated.

Showcase the product
Make your props point back to the product to always draw the eye back to what you’re trying to sell. This also helps to avoid overwhelming users with the lack of a focal point, as they’ll be visually directed where to focus their attention.
Match the brand
Regardless of your creative vision, the product photos must have a visual aesthetic that matches your brand. For example, REI uses vivid photography of nature and people in action. A staged photo with models posing for the camera wouldn’t match the brand aesthetic.
Shooting the Photos
About the same number of consumers (38%) say they’re most likely to buy a product if the images have a plain white background as the number who say they want to see photos contextually (37%).

What does that mean? You can’t please everyone.
When you’re shooting the product photos, remember to get a lot of a variety. Try different backgrounds, isolate the image, set the stage with lots of props, play with the lighting, and shoot from different angles.
You want to show the product in its best light, and to different consumers that could mean different things.
Play with lighting to create different effects — change the light sources and the positioning of the lights to create the look you’re going for. For example, light that’s directly above the subject typically achieves a more neutral look, while more shadows add drama and depth.
Find other ways to add drama and depth with the items in the shot, including the product, props and background. If you can add dimension somewhere, you’re likely to capture a visually interesting shot.
Examples of Styled Product Photos
It’s always helpful to take a look at some examples to see these tips in action.

The textures in the above product photo are exceptionally interesting: the tablecloth, the dish, the cookies themselves, the product packaging, the background and the tiniest touch of colorful dusting work together to showcase the cookies.

The cool koozie is especially great for use on the beach, hence the seashells peeking through in the background. The ice-cold drink and beach-friendly background make customers want what that koozie promises to deliver.

Above is a great example of a more playful execution mixed with modernity and simplicity. The texture of the wood background also makes a nice contrast to the black video game controller, which allows the product to stand out and be the star of the photo.

This is another example of exceptional creativity. Instead of the standard approach to the lipstick photographs, this particular photo highlights multiple colors and stays true to the Revlon brand.
Manage Expectations
If you’re a freelance product photographer, make sure you set clear expectations and deliverables with your clients beforehand. Always establish the budget beforehand, and make sure you’re clear on who pays for the post-shoot photo editing (or if it’s included), who is responsible for prop expenses, and other potential incrementals.
It’s also essential to understand what your client envisions creatively. Showing them some sample photos before the shoot to test the waters is always a good idea.
If you’re answering to a boss instead of a client, communicate the amount of work, time and budget required to pull off the styling for the shoot. It’s helpful to document everything (refer back to your plan) so your manager can see everything in black-and-white.
clipping path service
clipping path service
clipping path service
photoshop face swap
face swap photoshop
how to swap heads in photoshop
how to create a drop shadow in photoshop
reduce image size without losing quality photoshop
best camera for product photography
amazon image requirements
swap face in photoshop
convert to vector
amazon picture requirements
hair background
digital photos backgrounds
shoe photography
photoshop remove all white
face swap photo editor
change heads in photoshop
clipping path in photoshop
photoshop clipping paths
swapping faces in photoshop
reduce file size photoshop
how to swap faces in photoshop
reduce image file size photoshop
how to change file size in photoshop
how to replace sky in photoshop
magic wand tool in photoshop
reduce image size photoshop
sky replacement photoshop
blue background photoshop
product photography background
photoshop sky replacement
photoshop clipping paths
photoshop practice photos
product dimensions on amazon
amazon image size requirements
best size for amazon images
amazon image guidelines
portrait photography white background
photoshop clothing
off white backgrounds
blue photoshop background
ebay photo dimensions
amazon photo requirements
photoshoot style
what is photo editing
500x500 background
pen tool icon
auto face swap
etsy photos size
masking magic
how to face swap
ecommerce photo
product background
mannequin images
path images
image masking
ebay image size
etsy photo size
ebay picture size
photoshop reduce file size
ecommerce photography
etsy listing photo size
amazon product image requirements
amazon image requirements
photoshop practice pictures
reduce file size in photoshop
best camera for product photography
product dimensions amazon format
photoshop reduce image size
amazon product image size
hair transparent background
photoshop practice images
best image size for ebay
sky background images for photoshop
off-white background
beauty product photography
how to reduce image file size in photoshop
magic wand tool photoshop cs6
how to use photoshop cs6
how to change background color in photoshop cs6
how to remove white background in photoshop cs6
how to change background in photoshop cs6
how to reduce image size in photoshop without losing quality
how to get rid of whitespace in photoshop
how to take pictures for amazon
how to change the sky in photoshop
photoshop cs6 change background color
how to replace a sky in photoshop
how to photoshop faces onto things
how to photoshop a face onto another body
remove background color photoshop
how to blend faces in photoshop
how to do a face swap in photoshop
how to put a picture on a background in photoshop
clipping path service
clipping path service
photoshop face swap
face swap photoshop
how to swap heads in photoshop
how to create a drop shadow in photoshop
reduce image size without losing quality photoshop
best camera for product photography
amazon image requirements
swap face in photoshop
convert to vector
amazon picture requirements
hair background
digital photos backgrounds
shoe photography
photoshop remove all white
face swap photo editor
change heads in photoshop
clipping path in photoshop
photoshop clipping paths
swapping faces in photoshop
reduce file size photoshop
how to swap faces in photoshop
reduce image file size photoshop
how to change file size in photoshop
how to replace sky in photoshop
magic wand tool in photoshop
reduce image size photoshop
sky replacement photoshop
blue background photoshop
product photography background
photoshop sky replacement
photoshop clipping paths
photoshop practice photos
product dimensions on amazon
amazon image size requirements
best size for amazon images
amazon image guidelines
portrait photography white background
photoshop clothing
off white backgrounds
blue photoshop background
ebay photo dimensions
amazon photo requirements
photoshoot style
what is photo editing
500x500 background
pen tool icon
auto face swap
etsy photos size
masking magic
how to face swap
ecommerce photo
product background
mannequin images
path images
image masking
ebay image size
etsy photo size
ebay picture size
photoshop reduce file size
ecommerce photography
etsy listing photo size
amazon product image requirements
amazon image requirements
photoshop practice pictures
reduce file size in photoshop
best camera for product photography
product dimensions amazon format
photoshop reduce image size
amazon product image size
hair transparent background
photoshop practice images
best image size for ebay
sky background images for photoshop
off-white background
beauty product photography
how to reduce image file size in photoshop
magic wand tool photoshop cs6
how to use photoshop cs6
how to change background color in photoshop cs6
how to remove white background in photoshop cs6
how to change background in photoshop cs6
how to reduce image size in photoshop without losing quality
how to get rid of whitespace in photoshop
how to take pictures for amazon
how to change the sky in photoshop
photoshop cs6 change background color
how to replace a sky in photoshop
how to photoshop faces onto things
how to photoshop a face onto another body
remove background color photoshop
how to blend faces in photoshop
how to do a face swap in photoshop
how to put a picture on a background in photoshop
ReplyDeleteI have found that this site is very informative, interesting and very well written. keep up the nice high quality writing.
Product Photography Lahore
Nice to read your blogpost. Very inspirational and useful. I think props is the most important thing for photography. Using props is a very effective way of adding a bit of color to a lifeless landscape or a plain background. And by including a prop in these kinds of scene, you’ll have a strong focal point in your image to attract the attention of the viewer.
ReplyDeleteBest Regards,
Clipping Path Services
Clipping Path
Nice tips for diy product photography, very informative post. Thanks for sharing with us. we provide clipping path services
ReplyDeleteNice Post!
ReplyDeleteBest Regards,
photoshop image masking
Buy Smart TV Now click here Smart TV Price in Bangladesh Bye Others TV
ReplyDelete43 inch Smart TV Price in Bangladesh
40 inch Smart TV Price in Bangladesh
40 inch Smart TV Price in Bangladesh
55 inch andrid Smart TV Price in Bangladesh
32 inch frameless Smart TV Price in Bangladesh
32 inch internet Smart TV Price in Bangladesh
65 inch internet led tv Price in Bangladesh
50 inch smart glorious Smart TV Price in Bangladesh
43 inch glorious Smart TV Price in Bangladesh
32 inch android Smart TV Price in Bangladesh
40 inch smart android TV Price in Bangladesh
40 inch google TV Price in Bangladesh
Very inspirational and useful
ReplyDeleteCamera Settings for Car photography
This article got my mind. Thank you so much for this wonderful article. It helped me a lot.
ReplyDeleteBest Regards
Clipping path Company
This comment has been removed by the author.
ReplyDelete