Learn one of the key beginner skills in Photoshop, how to create and manipulate layers within an image.
Every image in Photoshop consists of multiple layers and each layered is often compared to sheets of acetate, with the ability to transparently see through each layer to the layer below it. The manner in which these layers are designed and stacked is what gives the image its appearance and appeal.
One of the main aspects of Photoshop is layers, and in order to use the software even in the most basic way, it’s important that users have a knowledge of what layers are and how they work.
So let’s get started.
The Layers Panel
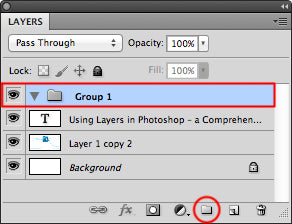
The layers panel in Photoshop is where you access layers and a wide range of features that make manipulating and designing these layers simple. It allows you to create, design, and redesign layers.
Creating a New Layer
Adding a new layer to an image enables you to achieve certain effects and appearances. There are two ways to do this.
First, click on the upper right corner of the layer panel and from the resulting menu select “New Layer”.
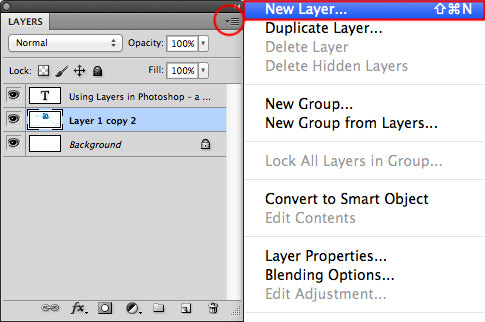
Second, click on the “New Layer” icon located at the bottom of the layers panel.

Duplicating a Layer
Right-click on the layer you wish to duplicate and then select “Duplicate Layer” from the menu. In the example image, you have an option of adding the layer to the same image or another image. To add to the same image simply give it a name and click OK.

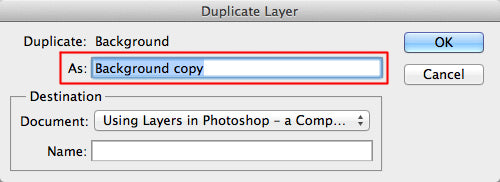
If, however, you wish to add the layer to a different image, type the title of that document in the box titled “Destination” and name it before clicking OK.

Alternating the Layers’ Positions on the Image
When working on an image in Photoshop, the different layers that make up that image are arranged in order of their position, from the one at the top to the background layer. You can alternate the positioning of these layers by clicking and dragging the chosen layer to the desired position.

Hiding or Deleting a Layer
When manipulating or changing an image it may be necessary to hide a layer and observe the image without it or delete the layer altogether. To hide a layer, locate it on the layer panel and click on the eye icon beside it. To make it visible, simply click on the icon again.
To delete a layer, click on that layer and drag it to the trash icon located at the bottom of the layers panel or right-click the layer and select “Delete”.

Changing a Layer’s Mode
You can change a layer’s mode to manipulate its appearance, feel, and texture. To change the mode, locate the tab “Opacity” on the layers menu. Click on the other tab “Normal” on the left side of the “Opacity” tab. This will open a drop-down menu with numerous modes to choose from. Click on the desired mode to apply it.

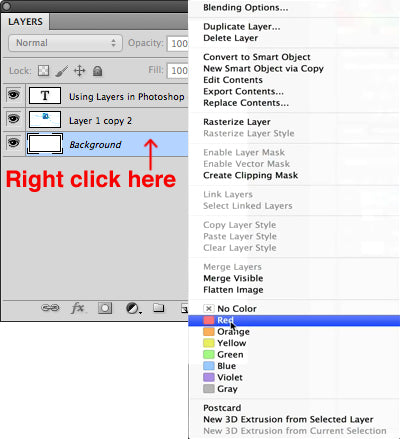
Changing a Layer’s Color
To change the color of a layer, right-click on a layer, then click on the color of your choice from the pop-up menu.
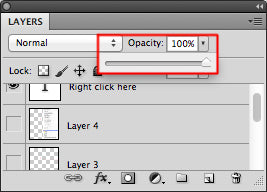
Adjusting a Layer’s Transparency
A layer on an image does not have to be opaque. You can make it partially transparent to to get different desired effects. Within the layer panel, click on the layer you wish to adjust, then the percentage in under “Opacity” at the top of the panel
Adding Styles to a Layer
You can add a host of effects to a layer to enhance its appearance and shape. Simply click on the layer and then click on the icon labeled “fx” at the bottom of the layers panel. This opens a menu with a wide range of effects to apply.

Tip: To protect a layer’s aspects, click on it and then click the “Lock” icon at the top of the layers menu. This will prevent mistakes being made that could compromise the image’s appearance.
Grouping Layers
If you wish to decongest or categorize the layers in the layers panel, click on the folder icon at the bottom of the page and drag the layers into the new folder to make a group.
A series of layers come together in Photoshop to make the image, and how you design them determines the appeal of the final results. To hone your layer-making and designing skills in Photoshop, we encourage you to practice and experiment with different images.
If you want to keep learning new Photoshop skills, try out our tutorial, “How To Create A Realistic Drop Shadow.”
clipping path service
clipping path service
clipping path service
photoshop face swap
face swap photoshop
how to swap heads in photoshop
how to create a drop shadow in photoshop
reduce image size without losing quality photoshop
best camera for product photography
amazon image requirements
swap face in photoshop
convert to vector
amazon picture requirements
hair background
digital photos backgrounds
shoe photography
photoshop remove all white
face swap photo editor
change heads in photoshop
clipping path in photoshop
photoshop clipping paths
swapping faces in photoshop
reduce file size photoshop
how to swap faces in photoshop
reduce image file size photoshop
how to change file size in photoshop
how to replace sky in photoshop
magic wand tool in photoshop
reduce image size photoshop
sky replacement photoshop
blue background photoshop
product photography background
photoshop sky replacement
photoshop clipping paths
photoshop practice photos
product dimensions on amazon
amazon image size requirements
best size for amazon images
amazon image guidelines
portrait photography white background
photoshop clothing
off white backgrounds
blue photoshop background
ebay photo dimensions
amazon photo requirements
photoshoot style
what is photo editing
500x500 background
pen tool icon
auto face swap
etsy photos size
masking magic
how to face swap
ecommerce photo
product background
mannequin images
path images
image masking
ebay image size
etsy photo size
ebay picture size
photoshop reduce file size
ecommerce photography
etsy listing photo size
amazon product image requirements
amazon image requirements
photoshop practice pictures
reduce file size in photoshop
best camera for product photography
product dimensions amazon format
photoshop reduce image size
amazon product image size
hair transparent background
photoshop practice images
best image size for ebay
sky background images for photoshop
off-white background
beauty product photography
how to reduce image file size in photoshop
magic wand tool photoshop cs6
how to use photoshop cs6
how to change background color in photoshop cs6
how to remove white background in photoshop cs6
how to change background in photoshop cs6
how to reduce image size in photoshop without losing quality
how to get rid of whitespace in photoshop
how to take pictures for amazon
how to change the sky in photoshop
photoshop cs6 change background color
how to replace a sky in photoshop
how to photoshop faces onto things
how to photoshop a face onto another body
remove background color photoshop
how to blend faces in photoshop
how to do a face swap in photoshop
how to put a picture on a background in photoshop
clipping path service
clipping path service
photoshop face swap
face swap photoshop
how to swap heads in photoshop
how to create a drop shadow in photoshop
reduce image size without losing quality photoshop
best camera for product photography
amazon image requirements
swap face in photoshop
convert to vector
amazon picture requirements
hair background
digital photos backgrounds
shoe photography
photoshop remove all white
face swap photo editor
change heads in photoshop
clipping path in photoshop
photoshop clipping paths
swapping faces in photoshop
reduce file size photoshop
how to swap faces in photoshop
reduce image file size photoshop
how to change file size in photoshop
how to replace sky in photoshop
magic wand tool in photoshop
reduce image size photoshop
sky replacement photoshop
blue background photoshop
product photography background
photoshop sky replacement
photoshop clipping paths
photoshop practice photos
product dimensions on amazon
amazon image size requirements
best size for amazon images
amazon image guidelines
portrait photography white background
photoshop clothing
off white backgrounds
blue photoshop background
ebay photo dimensions
amazon photo requirements
photoshoot style
what is photo editing
500x500 background
pen tool icon
auto face swap
etsy photos size
masking magic
how to face swap
ecommerce photo
product background
mannequin images
path images
image masking
ebay image size
etsy photo size
ebay picture size
photoshop reduce file size
ecommerce photography
etsy listing photo size
amazon product image requirements
amazon image requirements
photoshop practice pictures
reduce file size in photoshop
best camera for product photography
product dimensions amazon format
photoshop reduce image size
amazon product image size
hair transparent background
photoshop practice images
best image size for ebay
sky background images for photoshop
off-white background
beauty product photography
how to reduce image file size in photoshop
magic wand tool photoshop cs6
how to use photoshop cs6
how to change background color in photoshop cs6
how to remove white background in photoshop cs6
how to change background in photoshop cs6
how to reduce image size in photoshop without losing quality
how to get rid of whitespace in photoshop
how to take pictures for amazon
how to change the sky in photoshop
photoshop cs6 change background color
how to replace a sky in photoshop
how to photoshop faces onto things
how to photoshop a face onto another body
remove background color photoshop
how to blend faces in photoshop
how to do a face swap in photoshop
how to put a picture on a background in photoshop
Lovely tutorials for the Photoshop.You provide some of tips for the photo editing by using Photoshop. Your tips is really awesome.
ReplyDeleteGreat post. i like it. feeling great when reading your post .
ReplyDeleteClipping Path |
Clipping Path, shadow-service |
shadow service |
I'm so glad you posted your blog, it was so helpful. I'm looking forward to reading more Drop Shadow of your blog posts in the future.
ReplyDelete