Learn the five ways ecommerce retailers can turn dull images into dazzling product photos that will capture the customer’s eye and desire to buy.
When it comes ecommerce, it makes little business sense to spend good money on marketing and promoting your online store if the way your products are presented is not up to par.
On the other hand, delivering several high-quality product images on a product listing can turn a browser into a buyer. According to the Salsify survey, which analyzed data against 9 million products to calculate what product content impacts sales conversions, they determined images are among the most important criteria that drive buying behavior.
We’ve outline five ways you can turn dull images into dazzling product photos that will capture your customer’s eye and desire to buy.
1. Keep it simple and focused when showcasing your products.
Referring again to the Salsify survey, nearly three in five US digital respondents said they prefer to see three to four images. A mere 1% said they prefer not to see any photos.
There are millions of online merchants across the globe. Online shoppers have their pick of any product, so make sure your product images give them a clear idea of what they’re buying, and from all angles.
How?
Keep it simple:
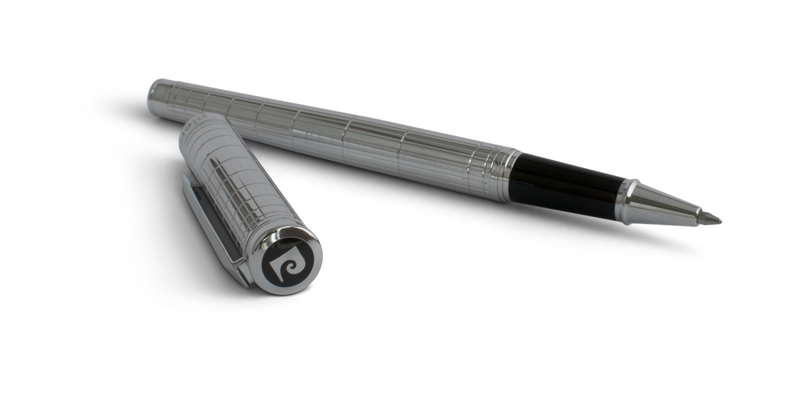
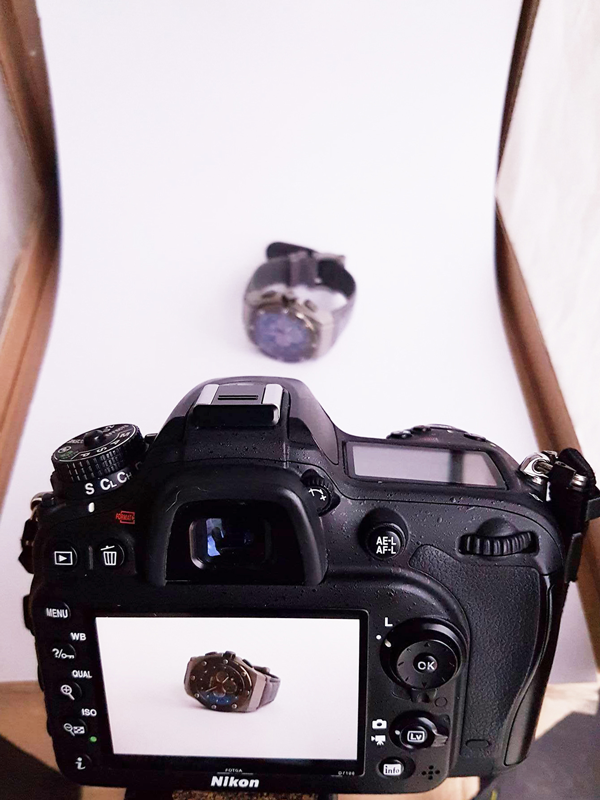
Present your products in the most simple, uncluttered, and straightforward manner. That means no distractions from, or additions to, the actual product. Use a clean, white background without distracting elements, unnecessary graphics, text, and other elements.
Choose the best angle:
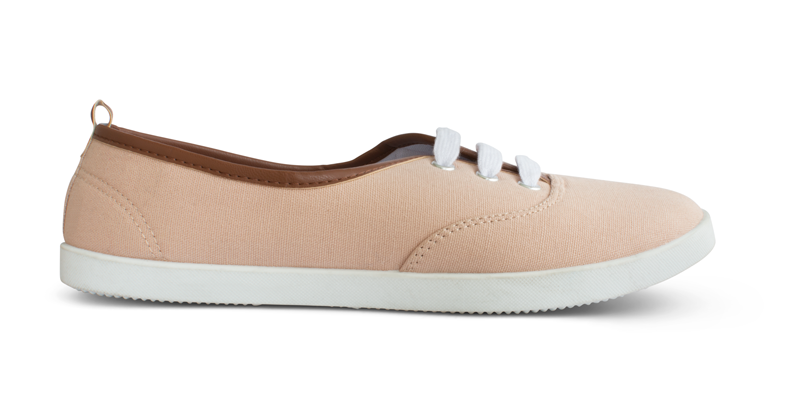
Think about the shape of an item, its silhouette, and how it will be used or worn. Have you placed the product in such a way as to display its form in the most flattering and informative manner?
Get your photos sharp and with the correct white balance:
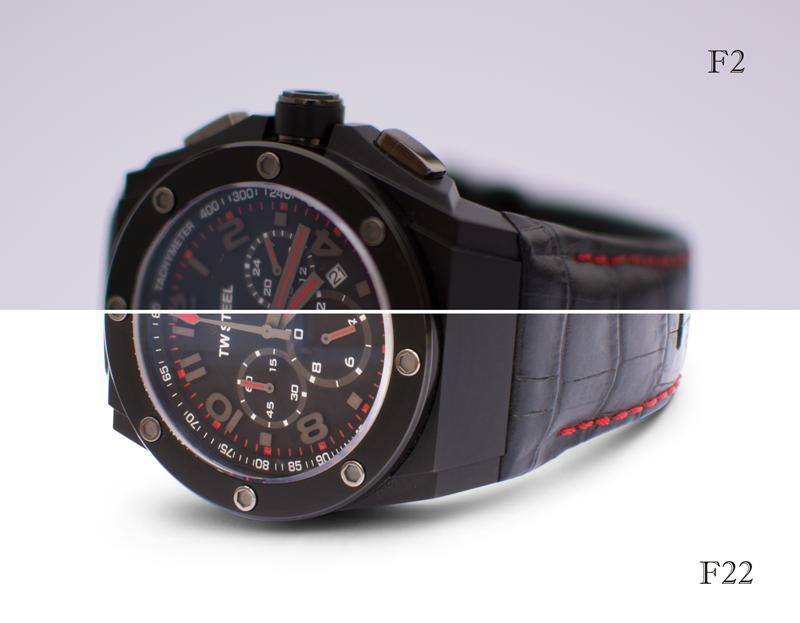
We cannot overemphasize the importance of shooting your products with a deep depth-of-field that displays everything sharp from the background to the foreground. This means using a small lens aperture, i.e. a larger f/stop number such as f/16 or beyond.
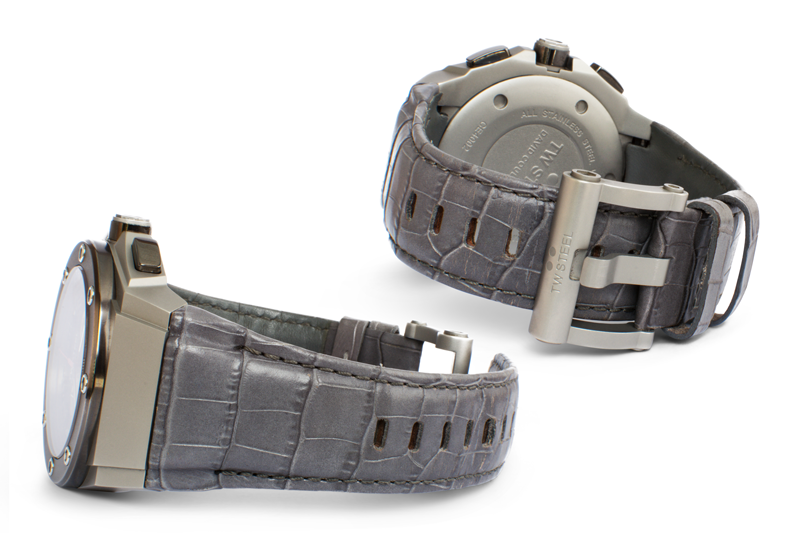
Shoot multiple images with different angles:
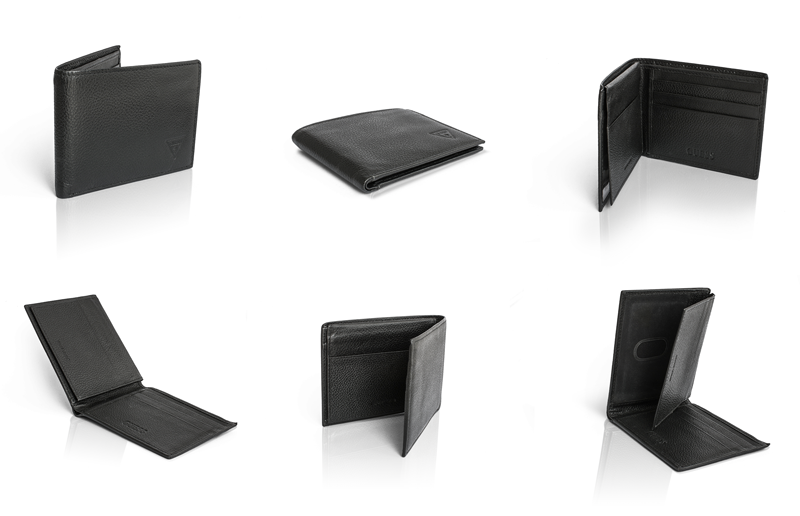
For some items, a single image might provide all the information a customer needs. For most, this is not the case. Provide views from numerous and different angles to guarantee that the buyer gets a full 360-view of the product.
Highlight important details:
Often the selling point of a product lies in the small details: the stitching, buttons or texture of clothing for example; or the well-designed and practical controls of an electronic item. Make sure your customers can see these elements clearly and understand their value and appeal.
By providing high-quality, high-resolution photos that retain their clarity when the customer zooms in close, you will save yourself time (and the sale) plus the customer’s patience of having to inquire with questions about the product.
2. Thrive in the age of visual commerce.
Ours is an increasingly visually-based culture. This means that product images play a central, powerful role in the customer sales journey and is particularly true for millennials. These digital natives have grown up with Instagram, Snapchat and emojis, and are never far away from their mobile devices.
With such acutely honed visual skills and barrage of content coming at them from every online channel imaginable, this highly influential demographic (by 2020, millennials are expected to control between $19 trillion and $24 trillion on a global scale, according to Deloitte) has little tolerance for substandard imagery. Make sure your product photographs are of high quality and professionally finished.
How?
Pay attention to image resolution:
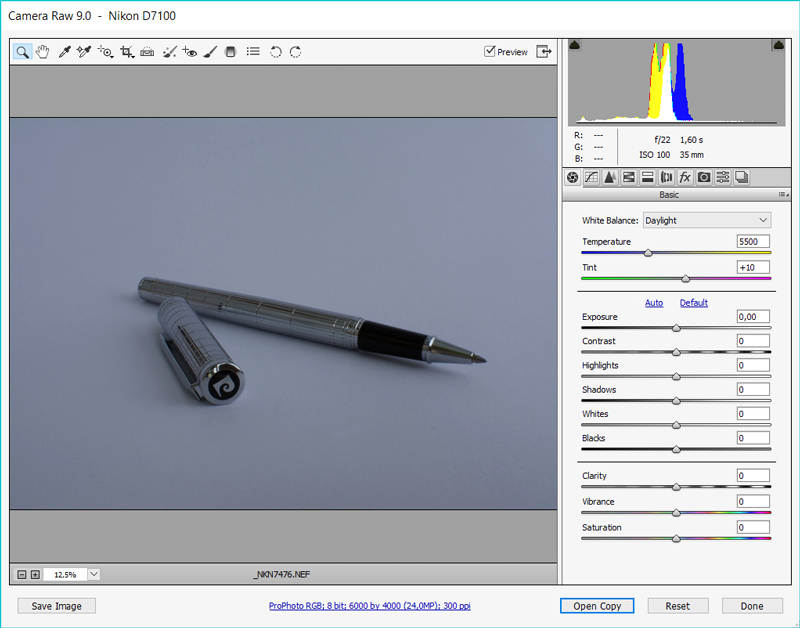
Start by shoot all your photographs in RAW format, not as JPEGs. JPEG files are already compressed, which means that a great deal of important information and detail has been removed from the image in order to create a smaller sized file. This will reduce your image optimization options with exposure, tonality, and colors when it comes to post-process of your photos.
No time to take your photos from dull to dazzling? No problem! Contact us for a free quote today and get your ready-to-post, high-quality images back in just 24 hours!
3. Represent your brand in its best light (figuratively and literally)
First, you need to ask yourself, what is your brand identity? This needs to be reflected in every way you connect with your customer, from messaging on your website and in marketing campaigns, to the visual design of your online store.
Because online shopping is so visually driven, if you present your products in captivating and dynamic ways, where people can clearly see product details and in their true colors, your store can compete with fellow ecommerce merchants all the way up to the big brands.
How?
Start with a clean background:
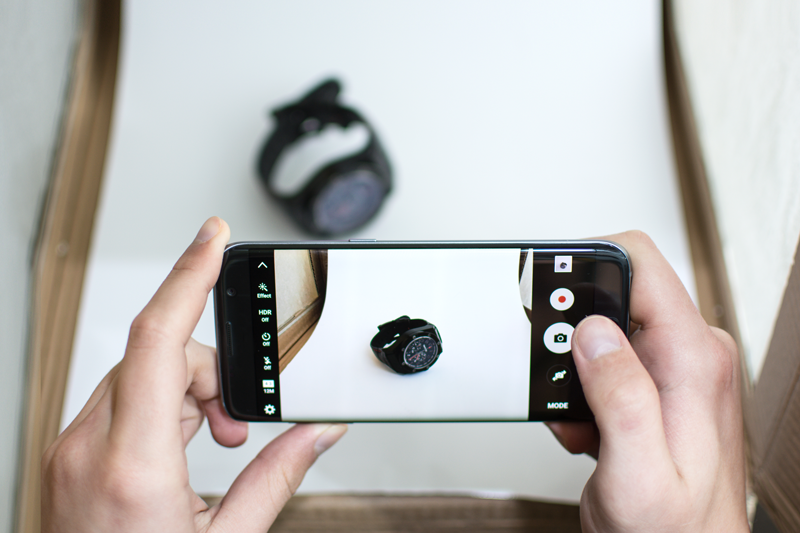
Although you will eventually make the background of the photo transparent during post-production, starting the with a clean white studio backdrop will make this task quicker and easier. Either use foam boards, a light tent, or a large sheet of white cardboard to make an infinity cove, bridging the right angle between desk and wall.
Related Content: DIY Product Photography - How to Style Your Next Shoot
Pay attention to the lighting look out for reflection:
Uneven backgrounds, strange color-casts, awkward and distracting shadows, unsightly reflections and glare – many of these problems can be improved, or even totally fixed, during the post-production stage. This also adds extra time and money resolving these issues to get the photo just right. Save yourself the hassle and production costs by getting your lighting right from the start, then your images will only require a minimum amount of editing and retouching work.

You can achieve fantastic results by using three small flash/strobe units and stands. Place two of the strobes in front of and slightly to either side of your product photo area, pointing them towards the white ceiling or walls, not at the product. The output of the strobes will reflect off the room’s hard surfaces, bouncing around to create a nice diffused and even light with little to no shadows (just make sure the walls and ceiling are truly white, otherwise your photos will have a strange color-cast!). Use the third flash to directly and evenly illuminate the background.
4. Plan your product images with the customer in mind
When planning out your photo shoot, think about all the ways your potential customers would want to visualize having that product themselves.
How?
Use a lifestyle or product in use photo:
In addition to getting high-resolution product images through the use of full-frame sensors and choosing a RAW format over .JPG., plan for capturing the photo in use. For example, if you’re selling mixers, show that product in the kitchen being used by a chef to make a delicious cake. If you’re selling clothing, think about a lifestyle photo of the target customer wearing that parka while at a ski lodge.
If there are several pieces to the product or if you’re selling a kit with several products, show the package of what they’ll get, designed as if they are opening the package themselves with all the goodies inside. If you have selling points, combine call-out benefit text with the product. Ensure that this type of image is professionally designed, where the benefits and selling features complement the photo image, not distract away from it.
5. Your options for optimizing images on a budget
High-quality images doesn’t need to bust your budget. There are a number of options for producing optimized product photos with a minimum of investment.
How?
Shoestring budget online editing solutions:
If you can’t justify the cost of Adobe’s premium photo editing software, there are a number of free, low-cost online alternatives. Keep in mind, they don’t have the editing power of Photoshop, but they can easily meet your needs if you’ll only need basic post-production requirements. Check out GIMP, PicMonkey, or Canva. All offer some serious photo editing features along with templates to create creative images for social media marketing. This will require time on your part, but they can be a great solution if you’re budget is tight.
Retouching requirements - is outsourcing your best option?
If you need to remove or optimize the background of your images, the online editing solutions will not enable you the editing freedom you get with Photoshop. If that is your only option, and you neither own the software nor have the experience and expertise with the platform, the next best budget step is to outsource.
Fortunately, the cost for quality, professional photo retouching is now very affordable. And since everyone knows that time is money, outsourcing your photo editing to professionals can save you precious overhead (and frustration) in trying to retouch images yourself.
Conclusion
Great looking product photography is within reach of any ecommerce merchant. There are many advantages for those willing to put in the time and energy to shooting and editing product images themselves. Additionally, for anyone whose time is limited, there are also budget-friendly, time-saving options available. Either way, the endgame is to consistently display dynamic, engaging product photos so your online browsers and convert into long-time, loyal customers.
clipping path service
clipping path service
clipping path service
photoshop face swap
face swap photoshop
how to swap heads in photoshop
how to create a drop shadow in photoshop
reduce image size without losing quality photoshop
best camera for product photography
amazon image requirements
swap face in photoshop
convert to vector
amazon picture requirements
hair background
digital photos backgrounds
shoe photography
photoshop remove all white
face swap photo editor
change heads in photoshop
clipping path in photoshop
photoshop clipping paths
swapping faces in photoshop
reduce file size photoshop
how to swap faces in photoshop
reduce image file size photoshop
how to change file size in photoshop
how to replace sky in photoshop
magic wand tool in photoshop
reduce image size photoshop
sky replacement photoshop
blue background photoshop
product photography background
photoshop sky replacement
photoshop clipping paths
photoshop practice photos
product dimensions on amazon
amazon image size requirements
best size for amazon images
amazon image guidelines
portrait photography white background
photoshop clothing
off white backgrounds
blue photoshop background
ebay photo dimensions
amazon photo requirements
photoshoot style
what is photo editing
500x500 background
pen tool icon
auto face swap
etsy photos size
masking magic
how to face swap
ecommerce photo
product background
mannequin images
path images
image masking
ebay image size
etsy photo size
ebay picture size
photoshop reduce file size
ecommerce photography
etsy listing photo size
amazon product image requirements
amazon image requirements
photoshop practice pictures
reduce file size in photoshop
best camera for product photography
product dimensions amazon format
photoshop reduce image size
amazon product image size
hair transparent background
photoshop practice images
best image size for ebay
sky background images for photoshop
off-white background
beauty product photography
how to reduce image file size in photoshop
magic wand tool photoshop cs6
how to use photoshop cs6
how to change background color in photoshop cs6
how to remove white background in photoshop cs6
how to change background in photoshop cs6
how to reduce image size in photoshop without losing quality
how to get rid of whitespace in photoshop
how to take pictures for amazon
how to change the sky in photoshop
photoshop cs6 change background color
how to replace a sky in photoshop
how to photoshop faces onto things
how to photoshop a face onto another body
remove background color photoshop
how to blend faces in photoshop
how to do a face swap in photoshop
how to put a picture on a background in photoshop
clipping path service
clipping path service
photoshop face swap
face swap photoshop
how to swap heads in photoshop
how to create a drop shadow in photoshop
reduce image size without losing quality photoshop
best camera for product photography
amazon image requirements
swap face in photoshop
convert to vector
amazon picture requirements
hair background
digital photos backgrounds
shoe photography
photoshop remove all white
face swap photo editor
change heads in photoshop
clipping path in photoshop
photoshop clipping paths
swapping faces in photoshop
reduce file size photoshop
how to swap faces in photoshop
reduce image file size photoshop
how to change file size in photoshop
how to replace sky in photoshop
magic wand tool in photoshop
reduce image size photoshop
sky replacement photoshop
blue background photoshop
product photography background
photoshop sky replacement
photoshop clipping paths
photoshop practice photos
product dimensions on amazon
amazon image size requirements
best size for amazon images
amazon image guidelines
portrait photography white background
photoshop clothing
off white backgrounds
blue photoshop background
ebay photo dimensions
amazon photo requirements
photoshoot style
what is photo editing
500x500 background
pen tool icon
auto face swap
etsy photos size
masking magic
how to face swap
ecommerce photo
product background
mannequin images
path images
image masking
ebay image size
etsy photo size
ebay picture size
photoshop reduce file size
ecommerce photography
etsy listing photo size
amazon product image requirements
amazon image requirements
photoshop practice pictures
reduce file size in photoshop
best camera for product photography
product dimensions amazon format
photoshop reduce image size
amazon product image size
hair transparent background
photoshop practice images
best image size for ebay
sky background images for photoshop
off-white background
beauty product photography
how to reduce image file size in photoshop
magic wand tool photoshop cs6
how to use photoshop cs6
how to change background color in photoshop cs6
how to remove white background in photoshop cs6
how to change background in photoshop cs6
how to reduce image size in photoshop without losing quality
how to get rid of whitespace in photoshop
how to take pictures for amazon
how to change the sky in photoshop
photoshop cs6 change background color
how to replace a sky in photoshop
how to photoshop faces onto things
how to photoshop a face onto another body
remove background color photoshop
how to blend faces in photoshop
how to do a face swap in photoshop
how to put a picture on a background in photoshop
No comments:
Post a Comment