Learn how to remove the background from your photos with this step-by-step Photoshop tutorial, covering hair on white background and other challenges for designers and photo editors.
For any ecommerce retailer, photographer or marketing professional, knowing how to remove the background from your photos is a skill you’ll use countless times. This step-by-step tutorial will show you how to remove hair from a white background.
Receive free ecommerce & product photography tips
One of the biggest frustrations when editing images of people is changing the background behind hair, which can waste time and ruin your images when done incorrectly. In this Photoshop tutorial, you’ll walk away knowing how to remove hair from a white background with the Background Eraser Tool. Once you have mastered how to cut hair in Photoshop CC18, you’ll be able to tackle any photo or image.
How to Remove Hair from White Background in Photoshop CC18
- Set up layers to edit hair on a white background
- Protect your original image file
- Create a high-contrast background
- Remove the background from around the hair
- Reduce Tolerance settings to remove low-contrast background areas
- Remove the rest of the background
- Replace the background
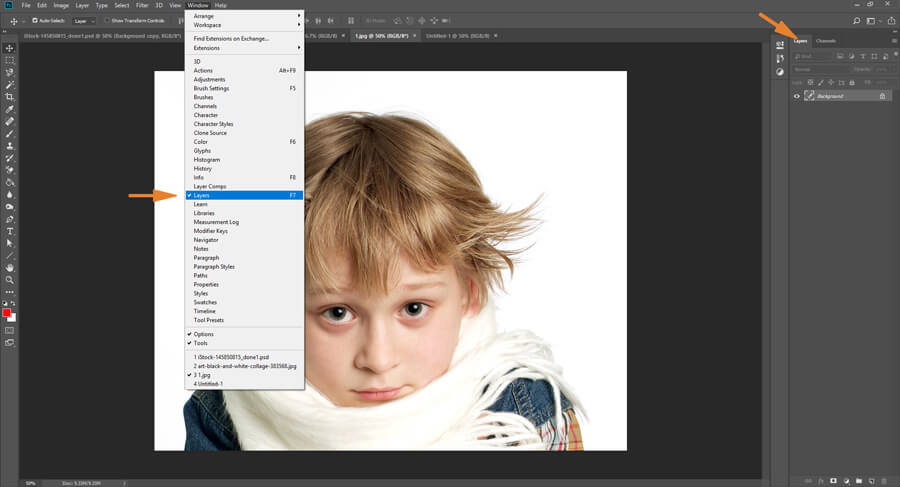
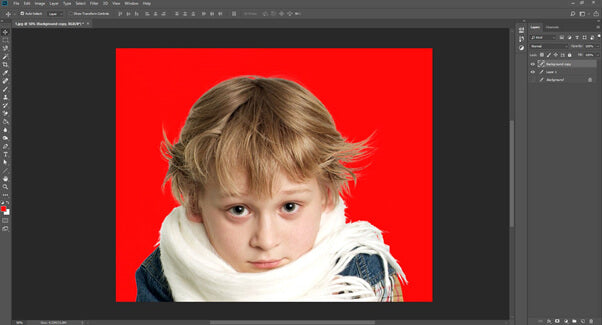
Step 1: Set up layers to edit hair on a white background
Make sure the layers panel is open. Your screen should look like this:
Step 2: Protect your original image file
Duplicate your original layer and then turn it off so that you can easily start again if you make a mistake. Right-click on the background layer in the layers panel and click Duplicate Layer...
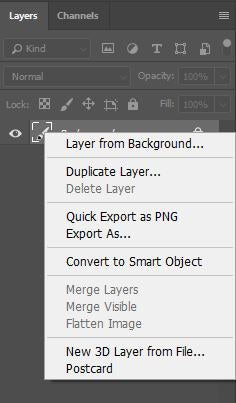
Next, click on the eye icon next to the original layer to turn it off for now.
Step 3: Create a high-contrast background
Now you’ll need to add a vivid color to make it clear exactly what it is you’re editing. Instead of simply using a white background and erasing around the edges, you can use a bright color that will show exactly which areas you have begun to cut out. This works particularly well if the original background you’re working with is a light color.
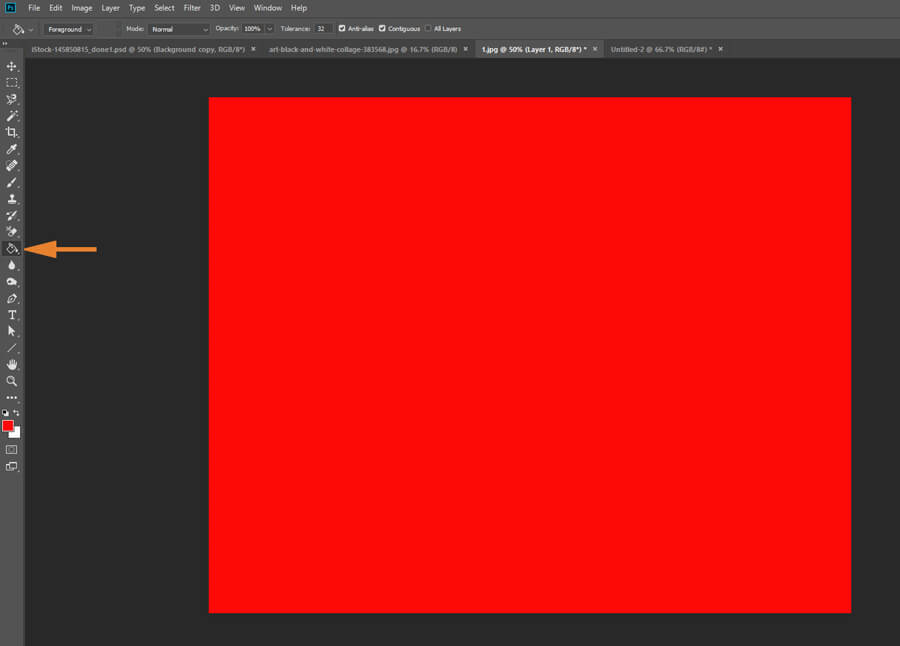
Once you’ve cut out the image entirely and are ready to put it into a new background, you can get rid of this bold color. Create a new layer by clicking on the page icon at the bottom of the layers panel.
Use the Paint Bucket tool to fill the new layer with a vivid color by clicking anywhere on the canvas, while the new layer is selected.
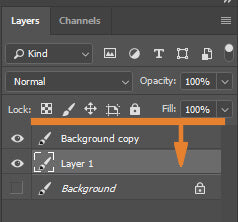
Move the new color layer underneath your duplicated photo layer. It will disappear to the naked eye, but it will still be there when you start to edit the photo. Just drag and drop it with your mouse.
Related: Photoshop Tutorial: A Beginner’s Guide to Using Layers
Step 4: Remove the background from around the hair
Select the Background Eraser Tool from the tools panel.

As this background is a solid color, you’ll need to use the Background Swatch sampling method and make sure the background color is set to as close to the main background color as possible. In this case, we have a solid white.
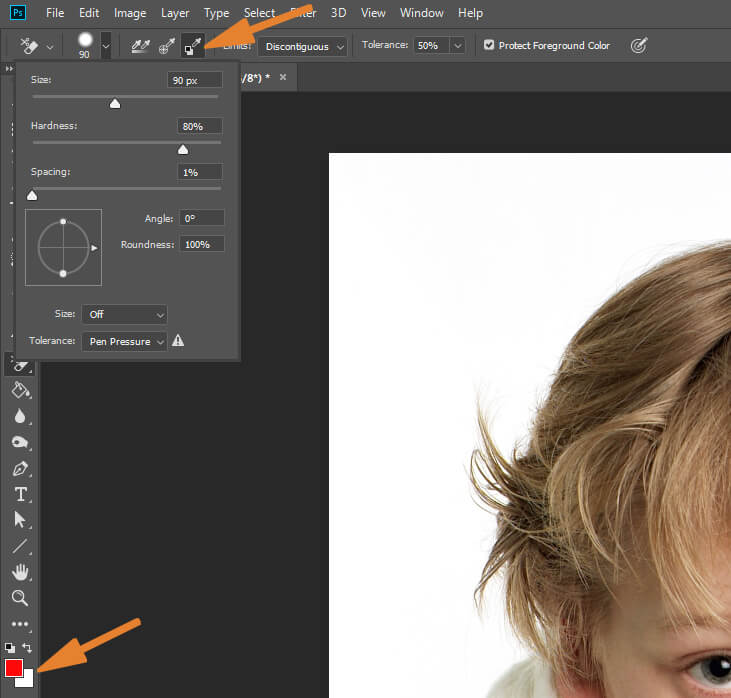
Make sure Discontiguous and Protect Foreground Color are selected. The Discontiguous setting prevents Photoshop from blending the color into the foreground, helping you to keep the two layers separate so that you can carry on editing.
However, this doesn’t always work on its own, so by selecting the Protect Foreground Color, Photoshop will keep the two layers entirely separate and make sure you don’t accidentally take out any of the original image while you’re cutting out the background.

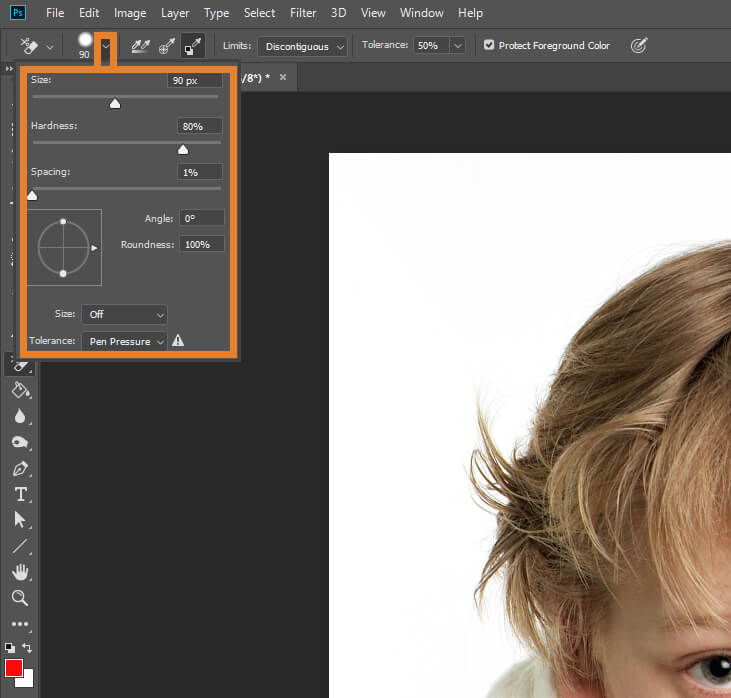
The next settings will depend on your image. Start with the brush settings you see above and tweak them if they don’t quite work for your example.
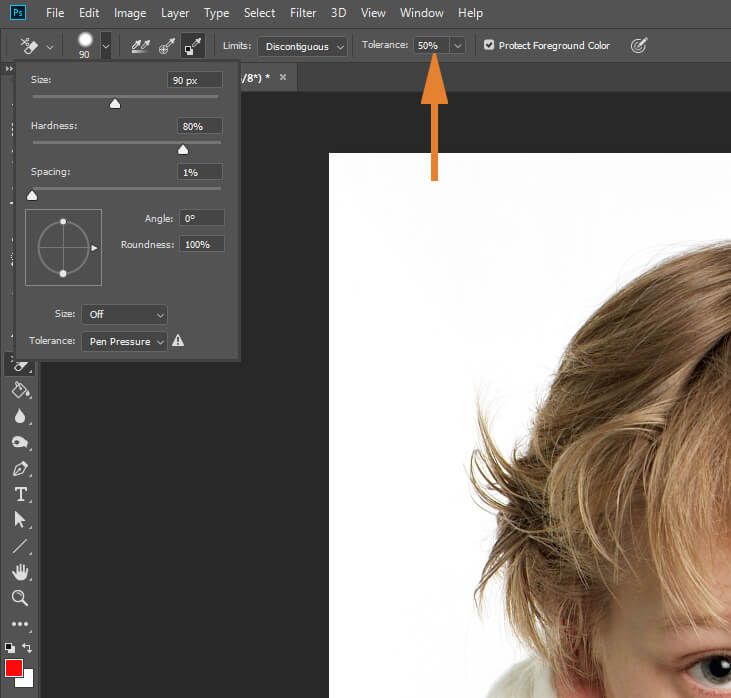
The most important setting here is Tolerance. This will tell the brush the contrast threshold of what to remove from your background versus your foreground. In this example, since the boy has light brown/blondish hair, we’ll settle on 50%. This should remove just enough white while leaving the hair intact. You may have to experiment with this setting to find the right balance.
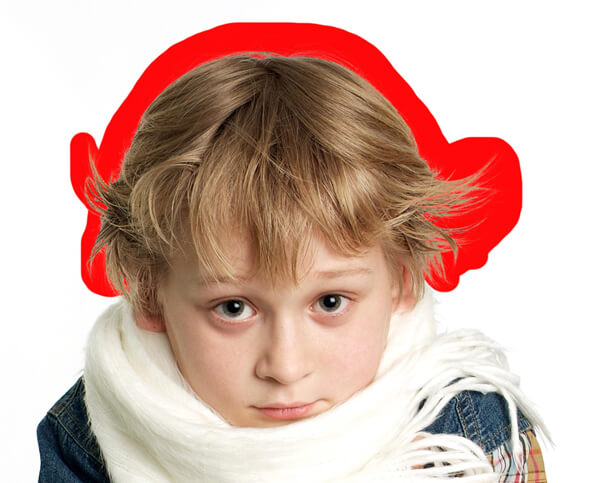
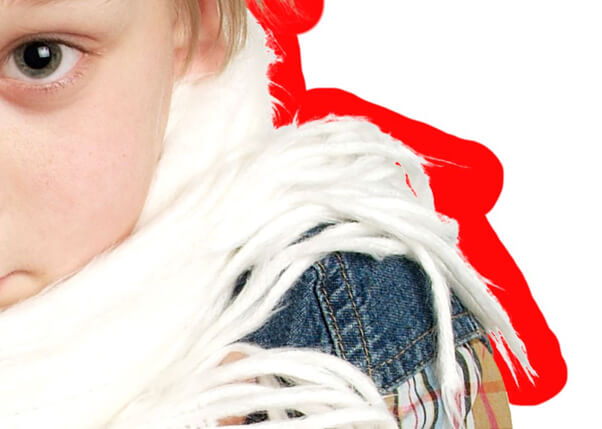
Using the brush, carefully erase where the hairline meets the background. Notice the red background showing through — this is the layer underneath that you created earlier. Also note the scarf in this example — the contrast is far lower here, so we’ll need to make some adjustments to the brush settings first.
Step 5: Reduce Tolerance settings to remove low contrast background areas
As you can see, the light-colored scarf is far closer to the background color than the hair, so we need to reduce the Tolerance setting to compensate. In this case, 5% works well. We’ve also reduced the brush size down to 30 to give us more control over the area we’re editing.

Zoom into the finer details and carefully erase around them using your new settings. The key is to find a balance between the brush size and Tolerance for different areas of your image.
Step 6: Remove the rest of the background
Now that the finer work is finished, we can begin removing the rest of the white with 50% Tolerance and a larger brush again.
Step 7: Replace the background
With the hard work now complete, the file is ready for you to replace the red background with something more useful.

How Do You Refine Edges in Photoshop CC18?
You can use the Refine Edges Tool to save time when dealing with background changes on images with lots of subtle edges, like hair or clouds in a sky.
Rather than cutting out each individual section, Photoshop will assess the difference in colors and draw a rough outline based on what it considers to be background and foreground.
For the tutorial on how to remove hair from white background above, we used the Tolerance Settingand Background Eraser Tool because we wanted to manually set how much color we wanted to be able to edit, rather than letting Photoshop determine the difference in colors. The Refine Tool works particularly well for nature shots (leaves on a sky background, for example).
Where Is the Refine Edge Tool in Photoshop CC18?
To find the Refine Edge Tool in Photoshop CC18, hold CTRL+ALT+R (CMD+OPT+R on Mac). Alternatively, go to the Select menu and click Refine Edge to open the toolbox.
clipping path service
clipping path service
clipping path service
photoshop face swap
face swap photoshop
how to swap heads in photoshop
how to create a drop shadow in photoshop
reduce image size without losing quality photoshop
best camera for product photography
amazon image requirements
swap face in photoshop
convert to vector
amazon picture requirements
hair background
digital photos backgrounds
shoe photography
photoshop remove all white
face swap photo editor
change heads in photoshop
clipping path in photoshop
photoshop clipping paths
swapping faces in photoshop
reduce file size photoshop
how to swap faces in photoshop
reduce image file size photoshop
how to change file size in photoshop
how to replace sky in photoshop
magic wand tool in photoshop
reduce image size photoshop
sky replacement photoshop
blue background photoshop
product photography background
photoshop sky replacement
photoshop clipping paths
photoshop practice photos
product dimensions on amazon
amazon image size requirements
best size for amazon images
amazon image guidelines
portrait photography white background
photoshop clothing
off white backgrounds
blue photoshop background
ebay photo dimensions
amazon photo requirements
photoshoot style
what is photo editing
500x500 background
pen tool icon
auto face swap
etsy photos size
masking magic
how to face swap
ecommerce photo
product background
mannequin images
path images
image masking
ebay image size
etsy photo size
ebay picture size
photoshop reduce file size
ecommerce photography
etsy listing photo size
amazon product image requirements
amazon image requirements
photoshop practice pictures
reduce file size in photoshop
best camera for product photography
product dimensions amazon format
photoshop reduce image size
amazon product image size
hair transparent background
photoshop practice images
best image size for ebay
sky background images for photoshop
off-white background
beauty product photography
how to reduce image file size in photoshop
magic wand tool photoshop cs6
how to use photoshop cs6
how to change background color in photoshop cs6
how to remove white background in photoshop cs6
how to change background in photoshop cs6
how to reduce image size in photoshop without losing quality
how to get rid of whitespace in photoshop
how to take pictures for amazon
how to change the sky in photoshop
photoshop cs6 change background color
how to replace a sky in photoshop
how to photoshop faces onto things
how to photoshop a face onto another body
remove background color photoshop
how to blend faces in photoshop
how to do a face swap in photoshop
how to put a picture on a background in photoshop
clipping path service
clipping path service
photoshop face swap
face swap photoshop
how to swap heads in photoshop
how to create a drop shadow in photoshop
reduce image size without losing quality photoshop
best camera for product photography
amazon image requirements
swap face in photoshop
convert to vector
amazon picture requirements
hair background
digital photos backgrounds
shoe photography
photoshop remove all white
face swap photo editor
change heads in photoshop
clipping path in photoshop
photoshop clipping paths
swapping faces in photoshop
reduce file size photoshop
how to swap faces in photoshop
reduce image file size photoshop
how to change file size in photoshop
how to replace sky in photoshop
magic wand tool in photoshop
reduce image size photoshop
sky replacement photoshop
blue background photoshop
product photography background
photoshop sky replacement
photoshop clipping paths
photoshop practice photos
product dimensions on amazon
amazon image size requirements
best size for amazon images
amazon image guidelines
portrait photography white background
photoshop clothing
off white backgrounds
blue photoshop background
ebay photo dimensions
amazon photo requirements
photoshoot style
what is photo editing
500x500 background
pen tool icon
auto face swap
etsy photos size
masking magic
how to face swap
ecommerce photo
product background
mannequin images
path images
image masking
ebay image size
etsy photo size
ebay picture size
photoshop reduce file size
ecommerce photography
etsy listing photo size
amazon product image requirements
amazon image requirements
photoshop practice pictures
reduce file size in photoshop
best camera for product photography
product dimensions amazon format
photoshop reduce image size
amazon product image size
hair transparent background
photoshop practice images
best image size for ebay
sky background images for photoshop
off-white background
beauty product photography
how to reduce image file size in photoshop
magic wand tool photoshop cs6
how to use photoshop cs6
how to change background color in photoshop cs6
how to remove white background in photoshop cs6
how to change background in photoshop cs6
how to reduce image size in photoshop without losing quality
how to get rid of whitespace in photoshop
how to take pictures for amazon
how to change the sky in photoshop
photoshop cs6 change background color
how to replace a sky in photoshop
how to photoshop faces onto things
how to photoshop a face onto another body
remove background color photoshop
how to blend faces in photoshop
how to do a face swap in photoshop
how to put a picture on a background in photoshop
2) Excellent post!
ReplyDeleteI love this blog. Thanks a lot for writing such an amazing writing. Background Remove Service is one of my favorite services. This service is great for graphics design. It is such an incredible matter which gives me pleasures in my mind.
i always follow this, super article and i benefited from this blog, thanks, your Photoshop clipping, background removal and image masking services really great.
ReplyDeleteIt is really nice post.....Are you want to know about background removal service? so, click, background remove service
ReplyDeleteThanks a lot for writing such an amazing article. Backgroundrremove Service is one of my favorite services. This service is great for graphics design. It is such an incredible matter which gives me pleasures in my mind.
ReplyDeleteI have more benefited from this good idea, this is a very good idea, thanks
ReplyDeletefashion photography editing tips
Thank you for sharing the tips to remove photo background, but I think the steps are too complicated. Currently, I'm using Leawo Photo BG Remover and it can help me remove background from image automatically.
ReplyDeleteExcellent tutorial about the photoshop.
ReplyDeleteBest Regards,
image masking
I was reading some of your content on this website and I conceive this internet site is really informative ! Keep on putting up.
ReplyDeleteThanks
image masking service
Wow, I love your article on how to remove hair from a white background in Photoshop CC18. I also really liked how you made the process detailed and easy to understand. I can't wait to try Hair Masking Service this out!
ReplyDelete